The Pyrrhic forces were split into three commands, left, centre and right. The left, contesting the hill, was made up of 13 elements; at 13 also was the centre. The right took the remaining 10 elements.
The Antigonids, working from left to right, again split their forces into commands of 7, 16 and 13.
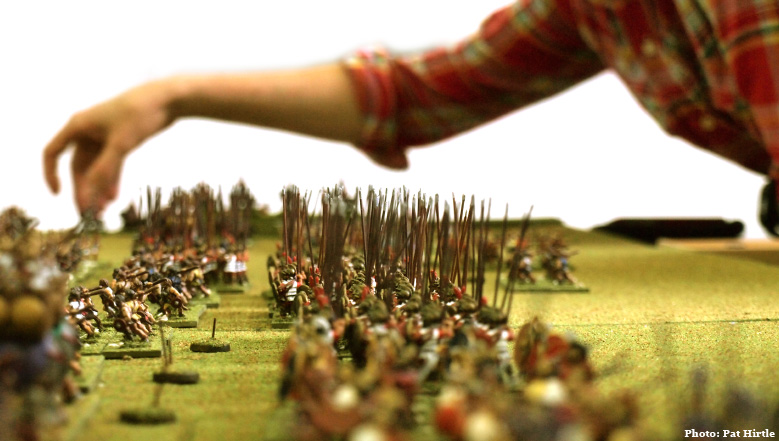
Both sides had cavalry-heavy commands contesting the hill, but Pyrrhus also put two elements of mediums to the left of the central phalanx. The picture below shows the forces about three moves into the game (again, all photos are taken from the Antigonid right).
Looking closely at the photo (click on it for a larger view) it is possible to see that the Antigonids had already claimed the hill by this time, and that the Pyrrhic left is refused to guard the extreme flank. On the other wing it can be seen that Pyrrhus kept his two elephants together to oppose the weaker Antigonid left. Antigonas has put one of his elephants to the left of the phalanx and another on the extreme right of the line, the latter to discourage aggressive outflanking actions by the enemy light horse.
For Pyrrhus the central command was allocated the low die, the left the mid, and the right the high. The plan here was to break through on the right and turn the flank of the central phalanx.
For Antigonas, the plan was essentially the same as in the first game: contest the hill, refuse the left, and try to break the enemy in the right and centre. To this end, the command allocations were low die to the left, mid to the centre and high to the right.

This second shot again shows the armies in the third turn. The (faux) Galatian warband in the foreground will prove their mettle before the day is done, despite some command confusion; the auxilia shown here about to ascend the hill would also be like a thorn unto their enemies.

The armies were slow to engage. Pyrrhus initially appeared content to give up the hill and to increase the pressure, with careful manoeuvre on his right complementing a steady advance in the centre.

But before long the preliminaries were over, and the lines met in a general clash. The Pyrrhic spear engaged the auxiliary on the hill and the medium cavalry met the Galatian warband in a vicious fight. On the Antigonid left, low pip dice prevented effective counter-measures to be taken against the enemy advance, and the troops there were caught disorganised and out of position.

In two bounds disaster strikes Pyrrhus: the Galatians destroy one of the cavalry opposing them and next turn swing onto the flank and dispose of the other. Another element of warband swings right to outflank the Pyrrhic spear struggling with the auxilia on the hill, and the line has been pierced.

The Pyrrhic left has taken heavy losses in the breakthrough, and the cavalry come down off the hill, demoralising the command. With their morale now low, the remaining troops of the wing fall prey to the marauding knight general and his supporting cavalry.

The Pyrrhic left has taken heavy losses in the breakthrough, and the cavalry come down off the hill, demoralising the command. With their morale now low, the remaining troops of the wing fall prey to the marauding knight general and his supporting cavalry.
At the same time, the Pyrrhic centre kills four elements of enemy pike, leaving the largest Antigonid command perilously close to breaking point. On the Antigonid left, the enemy come closer, threatening to fall upon the inactive troops at any moment.
But so much depends on the left; so Pyrrhus (here seen in the top left of the picture) must - not without a glance at the heavens - once again throw himself into the action to protect the flank of his phalanx from the Galation threat. Can he hold them for a turn or two longer to allow his right to roll up the phalanx?

On the extreme Antigonid left the killer blows falls quickly. In two turns they lose three elements. The demoralised command now begins to flee the field, leaving the central command (which starts with the elephant) in grave danger of being broken on the next or succeeding turn.

At this point, the camera was put aside and the tussle turned grim. The Antigonid right destroyed the opposing command utterly, leaving Antigonas two elements (or the commanding general) shy of the victory. Pyrrhus meanwhile needed to kill just one more element in the Antigonid centre to break the command and achieve victory for himself.
Antigonas attacked first but was driven off.

On the extreme Antigonid left the killer blows falls quickly. In two turns they lose three elements. The demoralised command now begins to flee the field, leaving the central command (which starts with the elephant) in grave danger of being broken on the next or succeeding turn.

At this point, the camera was put aside and the tussle turned grim. The Antigonid right destroyed the opposing command utterly, leaving Antigonas two elements (or the commanding general) shy of the victory. Pyrrhus meanwhile needed to kill just one more element in the Antigonid centre to break the command and achieve victory for himself.
It was the Antigonid bound - Antigonas and his companions charged into a single element of pike which had wrapped around and outflanked his phalanx; the Galatians outflanked two elements of pike which were also engaged to their front; two more elements of Galatians recklessly charged Pyrrhus himself - one to the front, and one to his flank. Thus, three combats with a possible five victims.
Next the phalanx drove into the enemy pike while the Galatians hacked at their right flank, yet still the Greeks held.
The Galatians now made their attack against Pyrrhus. A win would see Pyrrhus killed and victory for Antigonas; a loss would see a warband killed, the central command break, and a victory for Pyrrhus. A tie would see Pyrrhic troops fall upon the enemy next turn to surely seal the victory.
But once again, Pyrrhus fell!

No comments:
Post a Comment